Warning
This page is WIP.
Vehicle Generation
Introduction
Of course, the vehicle that is to be rendered in the game needs to be generated somehow and this is achieved through scripting in so-called GEN files. These files basically tell the game where to retrieve mesh files and textures from, how or if and when they are rendered (Levels Of Detail (LOD)). But they are also used to define any visual upgrade parts (changeable through upgrades) and any head, brake, or pit/rain lights available for a vehicle.
Typically, there are two different GEN files: One GEN file the in-game or track rendering and a second file for the showroom or spinner rendering of a vehicle. This page is structured according to that principle, with the first sub-section explaining the scripting in GEN files for the in-game generation of a vehicle and the second sub-section will explain the scripting in GEN files for the showroom or spinner generation of a vehicle.
All information included in this page, except tokens, were copied from the source files directly and amended or formatted as needed.
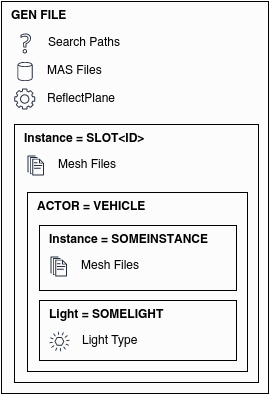
Structure of GEN Files
Search Paths, MAS Files, ReflectPlane, Main Instance, Actor, Sub-Instances
In-Game Generation of a Vehicle
The GEN file used for the generation of a vehicle in-game is usually having a simple name, like the name of the vehicle itself. It does not have a file name extension to not confuse with the GEN file used for generating the vehicle in the showroom. This GEN file is referenced to by one or more VEH files.
Tokens for In-Game
The available tokens for the in-game vehicle generation are:
Note
Tokens have the format <value>.
- ID
This is replaced by the proper slot identification (000, 001, etc.), or
- 1,2,3,etc
This is replaced by the first 1,2,3 characters of the vehicle GenString
- VEHDIR
This is replaced with the proper vehicles directory (e.g. E:Dataseason01vehicles)
- TEAMDIR
This is replaced with the proper team directory (e.g. season01vehicleswilliams)
- SPIN
For the vehicle spinner in the options only
- NOTSPIN
For everything EXCEPT the vehicle spinner
- LOW
Low detail only
- MED
Medium detail only
- HIGH
High detail only
- MAX
Maximum detail only
- DASHLOW
Low detail dash
- DASHHIGH
High detail dash
- STARTUPGRADES
These token starts the section of where mesh instances can be replaced through upgrade parts.
- STOPUPGRADES
These token ends the section of where mesh instances can be replaced through upgrade parts.
Example: For slot #2 using the vehicle file “nicecar.VEH”, the line
Instance=SLOT<ID> MeshFile=<123>gva.GMT
would be replaced with
"Instance=SLOT002 MeshFile=nicgva.GMT"
Search Paths
The search paths tells the game where to retrieve the model files and textures from to build an instance of a vehicle.
Note
Please note that the game always uses the last file it can find. So in case you have multiple files with the same name present in either the Search Paths or a MAS File, the game will always use the last one. Especially when using the Dev Mode, this can be a source of error.
- SearchPath
Example value: <VEHDIR>
The value can either be a token or a folder name or a combination of both. Paths are separated with a backslash
\.
Search Path Example
SearchPath=<VEHDIR>
SearchPath=SkipBarber
SearchPath=<VEHDIR>SkipBarber\maps
SearchPath=SkipBarber\maps
Mas Files Reference
The MAS files references tells the game from which packed files to retrieve the model files and textures from to build an instance of a vehicle.
- MASFile
Example value: SkipBarber\skipbarber.mas
Example value: cmaps.mas
The value can either be a token, a folder name, a file name, or a combination of all. The file extension
.masshould be included.
MAS File Example
MASFile=SkipBarber\skipbarber.mas
MASFile=cmaps.mas
Reflection Plane
The reflection plane is a definition of a layer needed to tell the game where to render the reflection of a vehicle. It is just one line in the GEN file but without this line, no reflection would be rendered.
- ReflectPlane
Example value: (0.0, -1.0, 0.0, 0)
Layer at which the vehicle is reflected.
ReflectPlane=(0.0, -1.0, 0.0, 0)
Instances
The vehicle generation is done basically by creating the main instance and
multiple nested instances inside it, all with one or more mesh objects in them.
Thereby the main instance always comes first and is defined as Instance=SLOT<ID>.
All nested instances follow the same principle but have default names or user-
defined names assigned.
Note
Please note that some default names are mandatory to appear in the GEN file or the game might crash when the vehicle is loaded. Those names are printed bold in the list below.
Default instance names are:
COCKPIT
WHEEL
WINDOWS
WINDSHIELDOUT
FWING
RWING
BODYIN
DEBRIS0 to DEBRIS9
LFTIRE
LFSPINDLE
RFTIRE
RFSPINDLE
LRTIRE
LRSPINDLE
RRTIRE
RRSPINDLE
HELMET
DRIVER
HLIGHTDS
HLIGHTPS
BLGLODS
BLGLOPS
BACKFIRE
File types inside an instance can be:
MeshFile
AnimFile
Every instance is started and closed using curly brackets, { and }. The
first line in every instance should then be the definition of the parameter
Moveable that can be True or False. After that, one or more mesh
objects can be defined to be part of an instance. These lines start with
MeshFile, followed by the file name of the mesh object to be loaded and
additional render settings.
Render settings for mesh objects
- Moveable
Example value: True
Can be True or False.
- CollTarget
Example value: True
Can be True or False. Sets whether the instance can collide with other instances.
- HATTarget
Example value: True
Can be True or False.
- LODIn
Example value: (0)
The number inside the round brackets is a distance in meters measured from the active camera’s position. This setting will tell the game when to show this mesh object:
LODstands for “Level Of Detail” andIncan be understood to be something like “when the object is being inserted into the scene”.- LODOut
Example value: (100)
The number inside the round brackets is a distance in meters measured from the active camera’s position. This setting will tell the game when to hide this mesh object:
LODstands for “Level Of Detail” andOutcan be undestood to be something like “when the object is being cut out of the scene”.- ShadowCaster
Example value: (True, Solid)
Can be True or False. If True, then the shadow the object creates can be further defined: It can be a solid static or a dynamic shadow.
- Reflect
Example value: NoLOD
Can be True or False or NoLOD.
- Damageable
Example value: True
Can be True or False.
- Render
Example value: False
Can be True or False. With this setting the object to be loaded but switched on or off for being shown in the scene. Typical use cases are shadow objects, which are supposed to cast shadows but should not be shown as an object in the scene, or collision objects, which should not be shown in the scene but invisibly block other objects from clipping with the objects enclosed by the collision object.
- AmbientObject
Example value: (True,Texture)
Was used to render flat shadows below vehicles. Is now obsolete.
Instance Example
The below code is an example for a mesh instance in the GEN file. For the purpose of this example all available options are included, but of course in practice only those found necessary should be included.
Instance=SOMEINSTANCE
{
  Moveable=True
  MeshFile=SOMEMESH_LODA.GMT CollTarget=False HATTarget=False LODIn=(0) LODOut=(123) ShadowReceiver=True ShadowCaster=(True, Solid) Reflect=True
  MeshFile=SOMEMESH_LODB.GMT CollTarget=False HATTarget=False LODIn=(123) LODOut=(456) ShadowReceiver=True ShadowCaster=(True, Solid) Reflect=True
}
Lights
- Type
Example value: Spot
Defines the type of light. Can be spot …
Render settings for light objects
- Pos
Example value: ( 0.51, 0.49,-1.9)
No explanation provided
- Dir
Example value: (-0.07,-0.08,-0.85)
No explanation provided
- Range
Example value: (0.0, 320.0)
No explanation provided
- Active
Example value: False
Can be True or False.
- Attenuate
Example value: (0.15, 0.01, 0.00003)
No explanation provided
- Hotspots
Example value: (10, 60)
No explanation provided
- Falloff
Example value: (2)
No explanation provided
- Intensity
Example value: (2.1)
No explanation provided
- Color
Example value: (254, 234, 184)
No explanation provided
Lights Example
The below code is an example for a headlight in the GEN file. For the purpose of this example all available options are included, but of course in practice only those found necessary should be included.
Light=HeadlightL
{
  Type=Spot Pos=( 0.51, 0.49,-1.9) Dir=(-0.07,-0.08,-0.85) Range=(0.0, 320.0) Active=False Attenuate=(0.15, 0.01, 0.00003) Hotspots=(10, 60) Falloff=(2) Intensity=(2.1) Color=(254, 234, 184)
}
Light=HeadlightR
{
  Type=Spot Pos=(-0.51, 0.49,-1.9) Dir=( 0.07,-0.08,-0.85) Range=(0.0, 320.0) Active=False Attenuate=(0.15, 0.01, 0.00003) Hotspots=(10, 60) Falloff=(2) Intensity=(2.1) Color=(254, 234, 184)
}
Light=TailLight
{
  Type=Spot Pos=(0.0, 0.87, 1.86) Dir=(0.0,-0.12, 0.85) Range=(0.0, 4.5) Active=False Attenuate=(0.51, 0.06, 0.05) Hotspots=(80, 170) Falloff=(0.75) Intensity=(0.7) Color=(250, 8, 8)
}
Showroom Generation of a Vehicle
The GEN file used for the generation of a vehicle in the showroom or spinner is usually having a file name extension “_spinner” but may have any other name to allow for easier distinction and reference in a VEH file. This GEN file is referenced to by one or more VEH files.
Tokens for Showroom
Available tokens in this GEN file are:
- ID
This is replaced by the proper slot identification (000, 001, etc.), or
- 1,2,3,etc
This is replaced by the first 1,2,3 characters of the vehicle filename
- VEHDIR
This is replaced with the proper vehicles directory (e.g. E:Dataseason01vehicles)
- TEAMDIR
This is replaced with the proper team directory (e.g. season01vehicleswilliams)
- SPIN
For the vehicle spinner in the options only